
Organization is key.
I have a content creation process I run through every time I write, from the initial concept to the final publication.
As you can imagine, I’ve gone through that checklist so many times that I know every step without even looking.
But, I still follow the process every time.
Why?
Mistakes happen.
No matter how well of a writer you are, you can’t count on remembering every detail every time.
Maybe you get interrupted halfway through.
…Maybe you didn’t sleep well last night.
…Maybe you mixed up your tasks.
That’s why you need replicable steps you can follow every time you create a piece of content, so you’re 100% confident with the output.

Keep reading to learn my foolproof content creation process!
How to build a content creation process
While the steps will vary depending on the exact type of content you’re producing, these are some general guidelines that apply regardless of whether you’re writing a blog or posting a YouTube video script.
I’ve broken these guidelines down into a 9-step process you can adjust to any project.
Once you have the framework down, it’s just a matter of plugging in the specifics of your branding, marketing, and promotion strategies to produce that perfect bit of content.
Step 1: Who are you creating content for?
You get an idea, and it’s exciting and new.
You dive into researching, brainstorming, and outlining.
Meticulously you craft every aspect until it’s a perfect representation of the idea in your head. It is indisputably an incredibly cool piece of content.
But who is it for?
HubSpot encountered this problem with its marketing strategy. They tried to appeal to a wide variety of customers by offering generic features.
As a result, their growth plateaued and nearly stalled completely.
However, when they honed in on a single target persona and created content relevant to that specific customer base, HubSpot experienced a significant uptick in revenue. 📈
The persona needs a name, age, and job title. Where do they live? What are their priorities? What are their pain points?
Go to a stock photo site like Unsplash or try a face generator if you need a tangible visual.
Document their demographics, psychographics, wants, needs, and desires in a spreadsheet or document.
Here’s a template that you can use as inspiration.

Use this every time you or your team creates a piece of content and think, “Am I writing for the correct person?”
Step 2: Research interesting and relevant topics
This is not as straightforward as it might seem.
There are a number of things to consider when first selecting a topic:
- Does it fit your persona?
- Why is it important?
- Is it a current trend or evergreen content?
- What’s already been written about it?
- What’s the unique angle?
Before you really commit yourself, do some preliminary research to make sure your idea really is worth pursuing.
Post-2021, there is very, very little novelty to the topic of working from home, for example.
Ask yourself: Do you have something new and interesting to contribute?
If not, you need to do some more brainstorming.
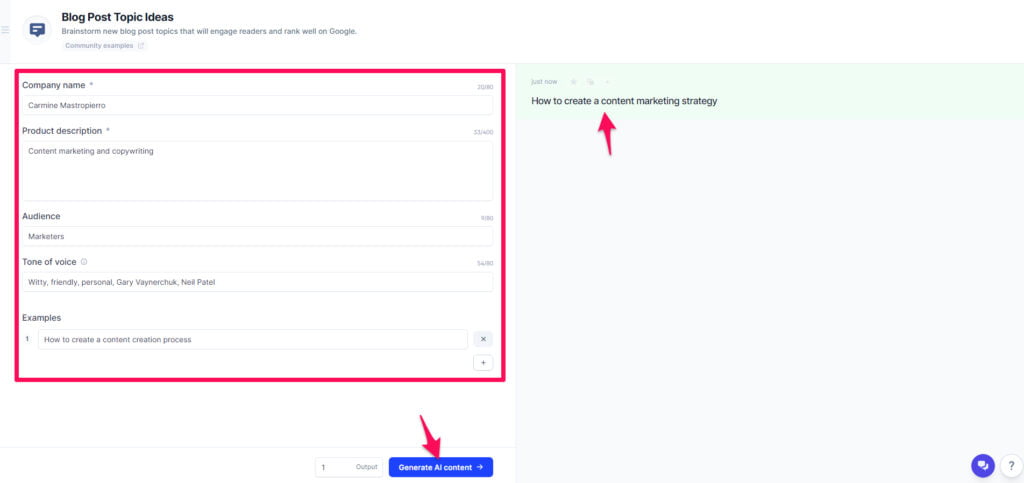
I actually just picked up this awesome tool called Jasper.ai. It’s an AI-powered copywriting tool that includes a blog post idea generator feature.
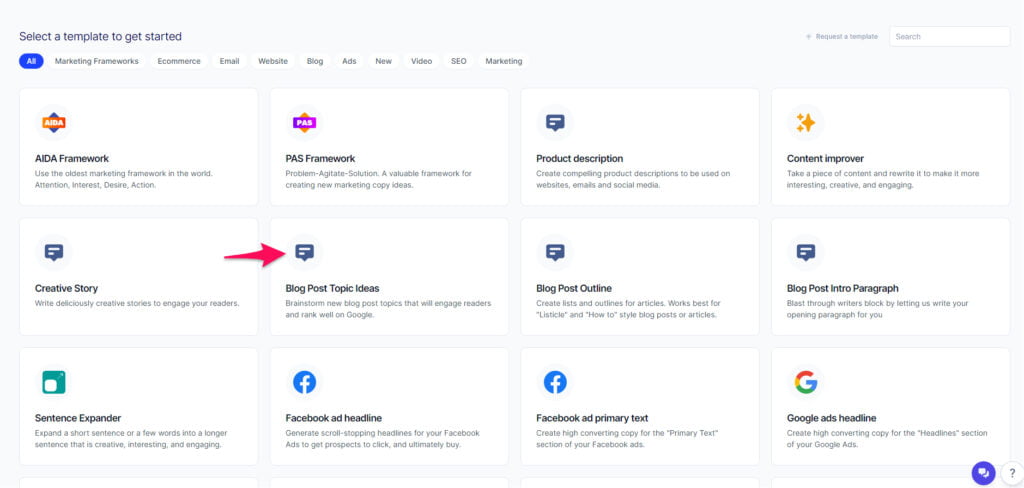
Enter your company name, details, audience, tone of voice, and examples to get inspiration.
Now onto step three.
Step 3: Find sources and vet them. Then vet them again.
The internet is an amazing resource of limitless information.
It’s also pretty sketchy and not always in places you expect.
If your information is unreliable or inaccurate, that’s going to blemish your brand. Vet and corroborate your sources. What bias(es) does your source have? Is there a credible, opposing viewpoint?
My rule of thumb is that if I’m unsure or unfamiliar with the source’s reputation, I look for backup sources, preferably ones I can verify as reliable.
Remember: just because you see the same information on more than one site, that doesn’t mean it’s true. Study both sites to determine whether they are actually two different sources, or simply a case of repurposed or duplicate contact.
If you can’t back it up, don’t use it. I also recommend both Logically and NewsGuard to help you weed out trustworthy sites from “fake news” and propaganda.
Step 4: SEO research is essential for driving traffic and increasing brand awareness
I’m a huge advocate of writing content for search engines.
It doesn’t matter if it’s a blog post … case study … whitepaper … who doesn’t free traffic naturally flow to their website?
You’d have to be crazy to not want that.
Search engine optimization really comes down to keyword research and placement.
I rank #1 for hundreds of keywords and regularly rank my clients for phrases they’re targeting as well.
The first step is to find these search terms.
While thinking about your chosen topic, ask who is searching for it and why. What is the question they’re asking or the information they’re looking for? What should your post actually be about to match this?
Start by Googling your topic and looking at the search results and related searches. Do they relate to what you want to say, or do the results show something completely different?
I suggest using a tool like Spyfu or SEMrush to speed up the process.
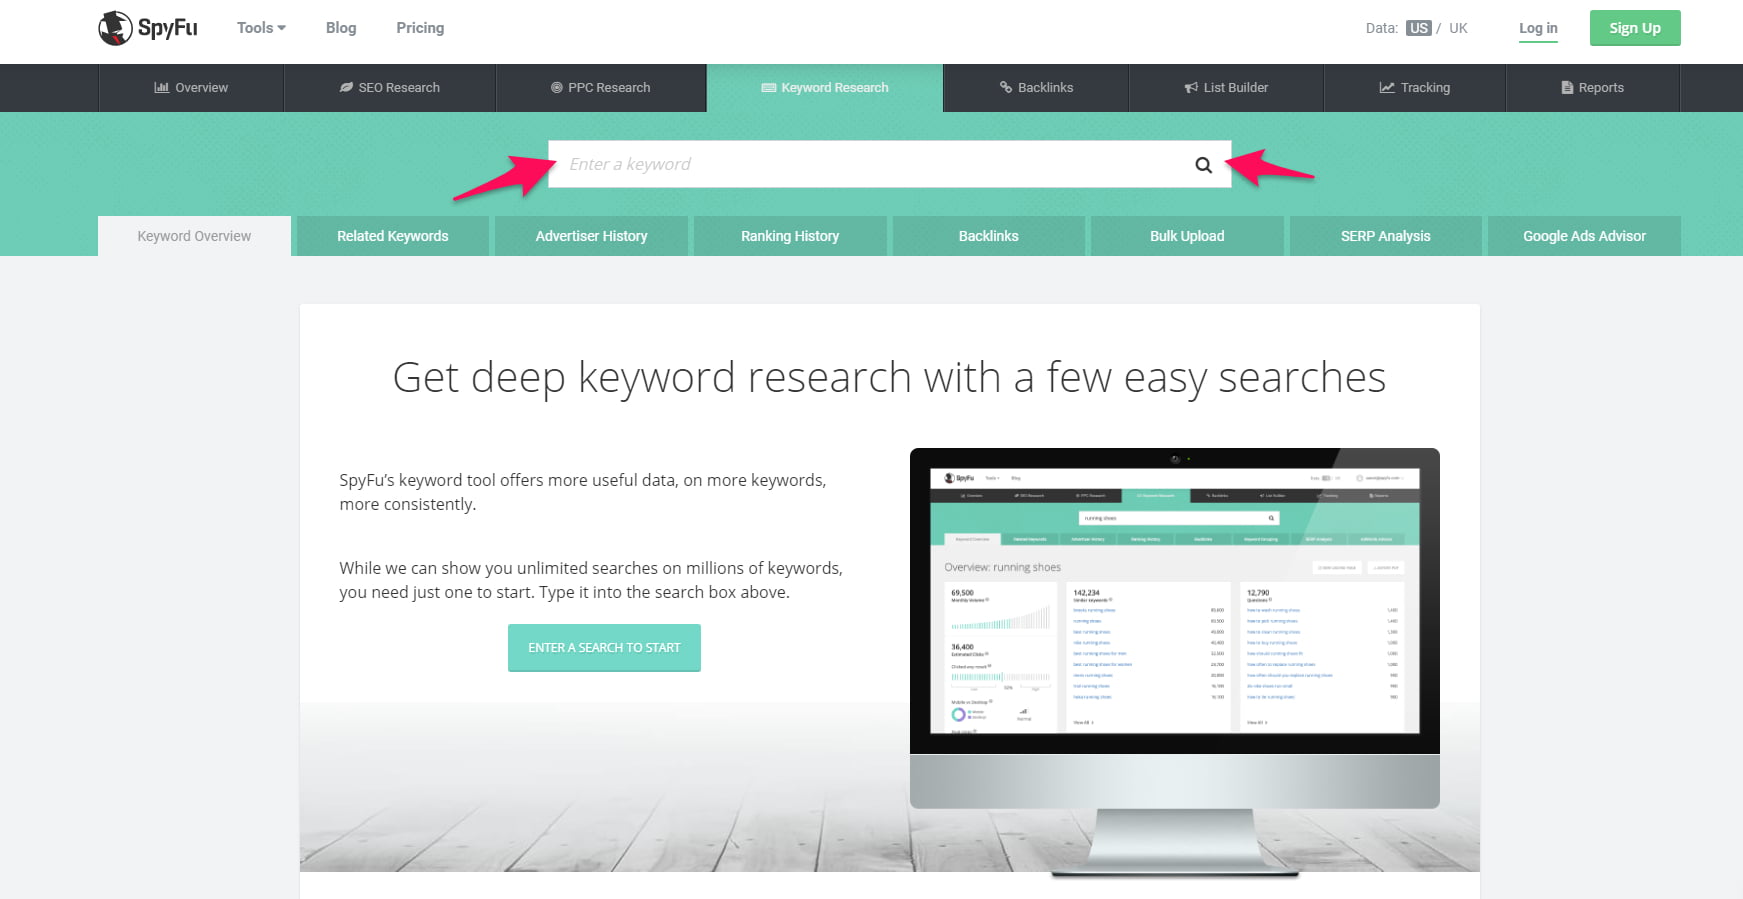
Enter a word related to the piece of content you’re creating and click.
This will give you keyword ideas along with their search data.
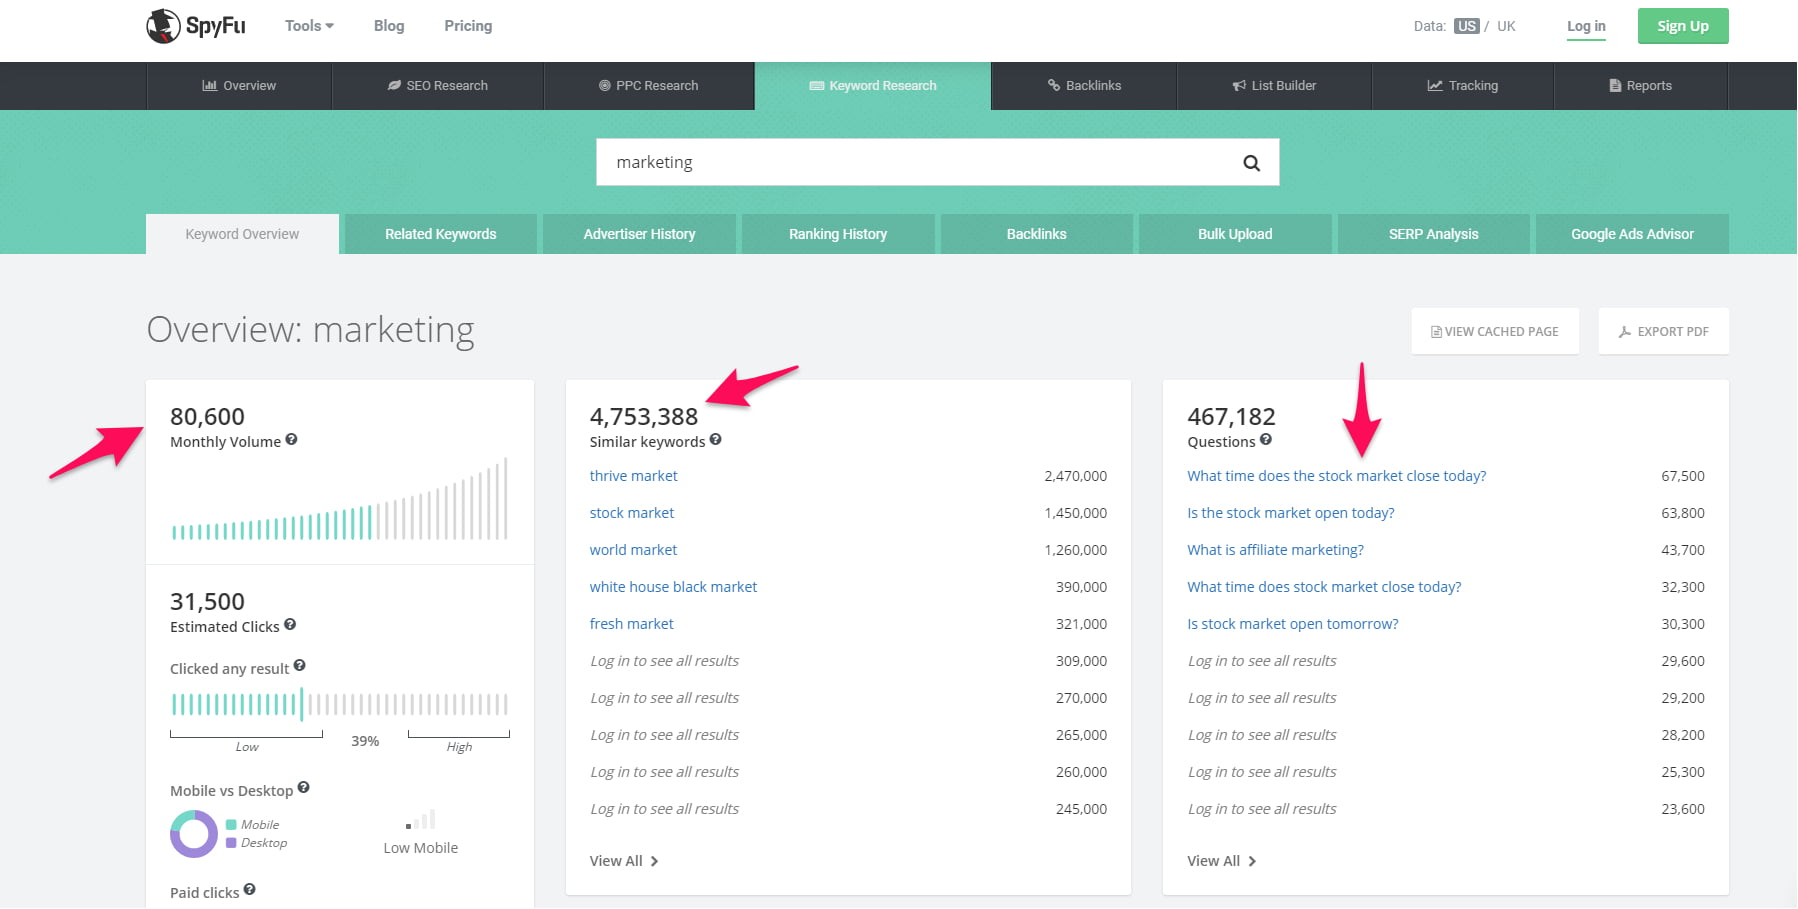
You want to target search terms that have low competition but moderate to high volume.
The more authoritative your business, the more competitive of keywords you can select.
Ahrefs is also a good tool for narrowing down your keyword search. It offers various reports on the ranking and volume of different keywords. You can also do a content search (see who else has published about a topic) or a site search to find related content on a specific site.
And here’s a little-known secret…
If you target long-tail keywords, you’ll rank on the first page very easily.
Sure. They don’t get a ton of traffic, but here’s the thing: the algorithm will see you ranking on the first page for a certain topic and start to trust your website much faster.
THAT’S when you start playing in the big leagues and target very competitive search terms.
Anyways…
Once you have a keyword, what do you do with it? Put it in your back pocket?
No. You’re going to place it exactly like this on a web page:
- In the URL (/content-creation-process, for example).
- In the title of the page.
- Within the meta description.
- In the introduction and conclusion.
- Within the first paragraph.
- A few times throughout the page (check how many times competitors use it for reference.)
- In the alt text and file names of media.
Voila! It’s really as easy as that. SEO takes 3–6 months to pay off, so be patient.
Step 4: Establish KPIs for the content and each channel it will be promoted on
How do you know whether or not the content is collecting dust or crushing it?
Key performance indicators, or KPIS for short.
These metrics help you track content and determine if it’s doing a good job or needs a push.
Here are some of the foundational metrics I recommend that your team measures:
Traffic
How many visitors is each piece of content generating?
Where does this traffic come from?
While traffic is mostly a vanity metric (as in it just looks nice), it’s still worthwhile to track.
A week-over-week or monthly increase in traffic—with the right funnel—can also mean more conversions and revenue.
Connect Google Analytics to your website and navigate to the “Behaviour” section.

Select “All Pages” from the left sidebar.
Here you will see all of the top pages on your website along with metrics like bounce rate and average time on page.
As a side note:
- A good bounce rate is 50% or less.
- A good average time on a page is 2 minutes or longer.
Look for a steady rise in pageviews while taking notes on what types of content receives the bulk of traffic.
Produce more of that content to continue driving growth.
That brings me to my next point.
Engagement
Engagement is a catch-all term for all of the ways users engage with a piece of content.
This means likes. Comments. Shares. You name it.
It’s important to measure this because it allows you to see if the content is being enjoyed and provides value to your audience.
Low engagement?
You may have to try new topics or write better sales copy while sharing it.
High engagement?
Make more of that style of content.
For instance, click the analytics at the bottom of a LinkedIn post to view more engagement data.

This will display information about who engaged with your post.
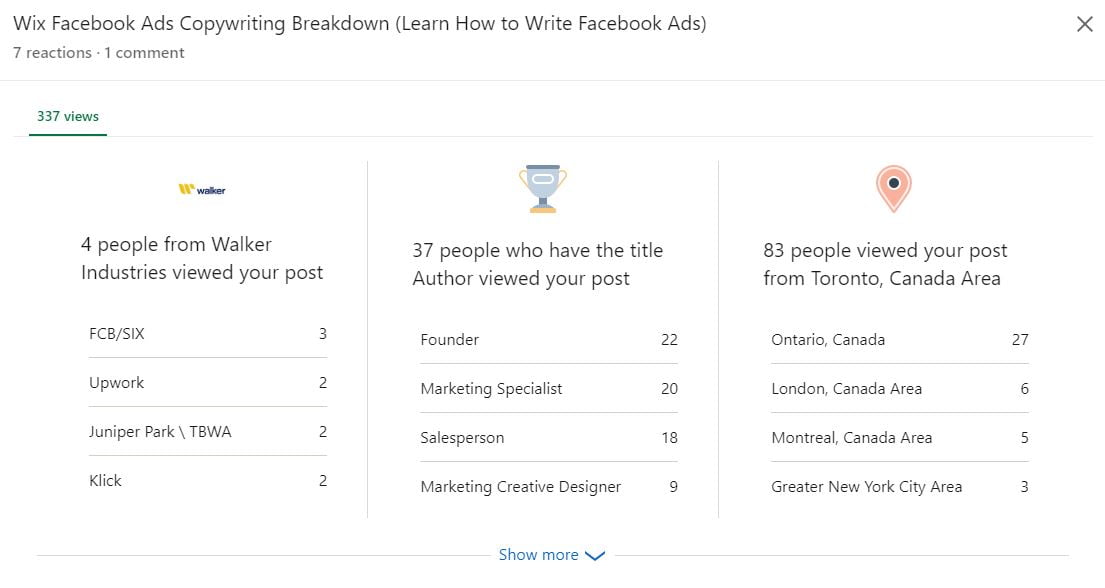
Use this to measure whether or not your content is reaching the right audience and how much engagement it drives.
Leads
Your content needs to drive bottom line.
Otherwise?
It’s essentially a paperweight.
You see, the problem with a lot of content nowadays is that its fluff.
It doesn’t help people, and it’s only written to reach a quota or appease your content manager.
That’s why I highly recommend measuring how many leads your content generates.
After all, you want to grow through content marketing, right?
Keep in mind that standard marketing funnel.
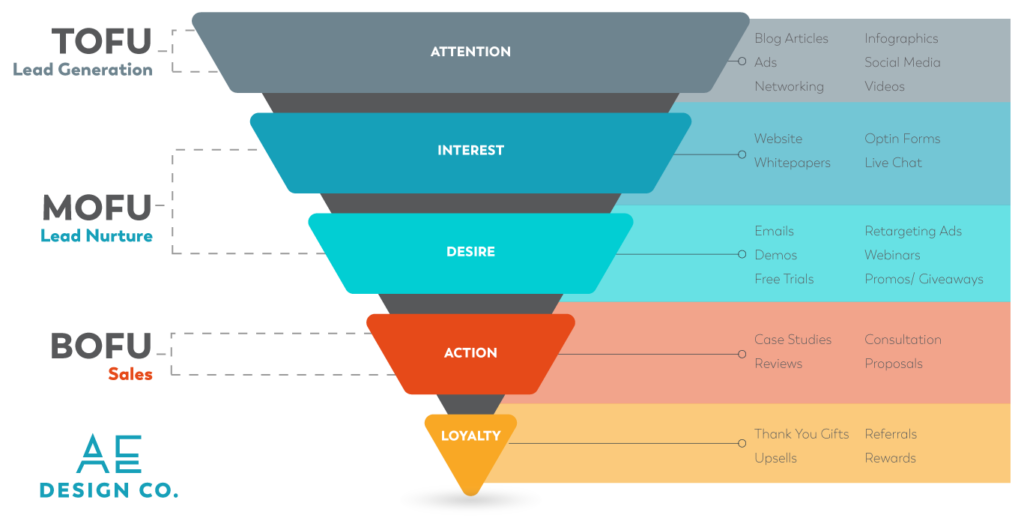
Your content, such as blog posts, will drive users to your website, where you need to capture them with a lead magnet.
This can be case studies, whitepapers, templates, checklists, etc.
Send these leads through automated sequences that eventually pitch your products, services, or another closing mechanism like a free consultation.
Step 5: Get your team organized in a content calendar
Content creation is all about the process…
That means if you’re disorganized, the content won’t perform very well, you won’t hit deadlines, and ultimately it won’t move the needle.
That’s no good.
How do you get around this?
Simply by creating a content calendar for you and your team to use for scheduling and publishing.
A content calendar can be as barebones as a spreadsheet or created inside tools like HubSpot, which you can try for free.
Ideally, you’ll have columns for:
- Topics
- Keywords
- Team member(s)
- Channel(s)
- Social copy
- Hashtags
- Publishing date
- Notes
Here’s an example of what a finished content calendar looks like.
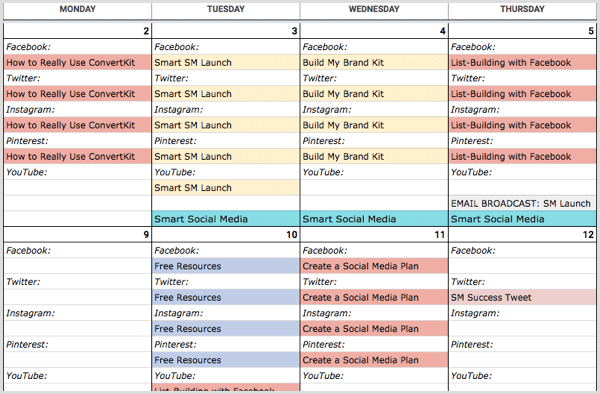
Take advantage of dropdown lists and similar features to save space.
Step 6: The joy of creating… Sort of
Now you get to release all that pent-up creative energy and embrace your inner artist.
Kind of.
By all means, dump everything onto the page for that first draft.
When you go through to edit, though, make sure it matches both your persona and their search intent.
Don’t forget the title in this consideration, either; if you make a promise, you better follow through. No one likes clickbait.
These are some of the most common mistakes I’ve found when editing content:
- Make sure you address the reader and not a general audience.
- Avoid jargon/technical terms. There’s a time and a place for this, but your average blog post is neither. If you’re writing a technical manual or for a specialist site, that’s a different story. Just make sure the language you use aligns with your persona’s knowledge and skill set.
- Use subheadings, quotes, and images to break up large chunks of text, particularly if your post is more of a long read. Using charts and infographics can really bring an otherwise dry topic to life, and – particularly with digital content—readers prefer more whitespace than less.
- Make sure it’s scannable. This is for the same reason. Digital content is usually consumed in short bursts, like during commutes, on breaks, etc. Format the text so your reader can get the gist quickly if they don’t have time to do a deep reading. It’ll also help them determine if the post is relevant to them. There’s nothing more frustrating than wasting 5 or 10 minutes on a post you belatedly discover is not what you thought.
Something that has been life-changing (no exaggeration) is using Jarvis/Conversion.ai. This artificial intelligence-powered tool writes content and copy for you within seconds. Yes, really. Watch the review I did and try it here yourself.
(For more on improving your content’s readability, check out this post with 9 easy tips.)
Step 7: Revise, revise, revise
Nothing is perfect the first time. Sometimes it’s not even perfect the fifth time. I recommend doing at least two revisions.
After that, you need to create a pre-publishing list to include all the final polishing. Some of the things you should include are:
- Correct structure and formatting.
- All links and images work properly.
- Consistent capitalization throughout the text and within subheadings.
- You’ve added appropriate tags, categories, and a description for SEO.
- The post is scheduled to publish at the correct date and time.
Here’s a great video from Neil Patel on how to edit blog posts in particular.
Step 8: Schedule and release into the wild
Do one final check before publishing the post. Trust me. There might be a ridiculous typo in the third paragraph hidden from you through every revision. Get rid of it now.
The next step in the content creation process is to schedule it.
Establishing a social media calendar is a good way to keep all of this on track, and identify where any gaps in your content schedule might be. And, just like creating the content, promotion is a process, as well.
You want to make sure that your content is being promoted on each channel at the optimum times for that channel and your persona.
You also want to check that any images or other media you include on these posts are designed well for placement. If an image is cropped so the primary message isn’t visible, you’ve just wasted an opportunity.
Let’s talk about that more.
Step 9: Distribute the content for maximum ROI
I know that you thought you were done.
Not quite yet.
The next step in the content creation process is to distribute the content through each channel you previously planned.
Social media will be one of the first places you release your content like an animal into the wild.
The key is to write sales copy while sharing it that creates a sense of urgency or curiosity.
You can do this by first targeting the pain point of your audience.
For example, if you’ve published a piece of content on how to acquire more clients, you could ask:
- “Are you sick and tired of an empty pipeline?”
- “Struggling to close clients when the last one leaves?”
- “Revenue constantly going up and down?”
The goal of this is to grab the attention of the audience while also spiking their emotions—making them more likely to click.
Curiosity can be created by revealing some information but withholding key components to make them think, “Let me find out more!”
Continuing with the previous example, you could say, “78% of startups make this client acquisition mistake. Are you?”
End that sucker with a call to action. “Learn more” or “Read it here” will work just fine. (Or tailor it to exactly what they’ll get out of the content.)
Hashtags are mandatory as well. This is a super simple way to increase your reach in a matter of seconds.
Ideally, you’ll include a few hashtags. Don’t go overboard and stuff it like a piñata. It looks spammy.
Then, send it out to your email list.
Email marketing can generate $40 for every $1 spent.. And, yes, you read that right.
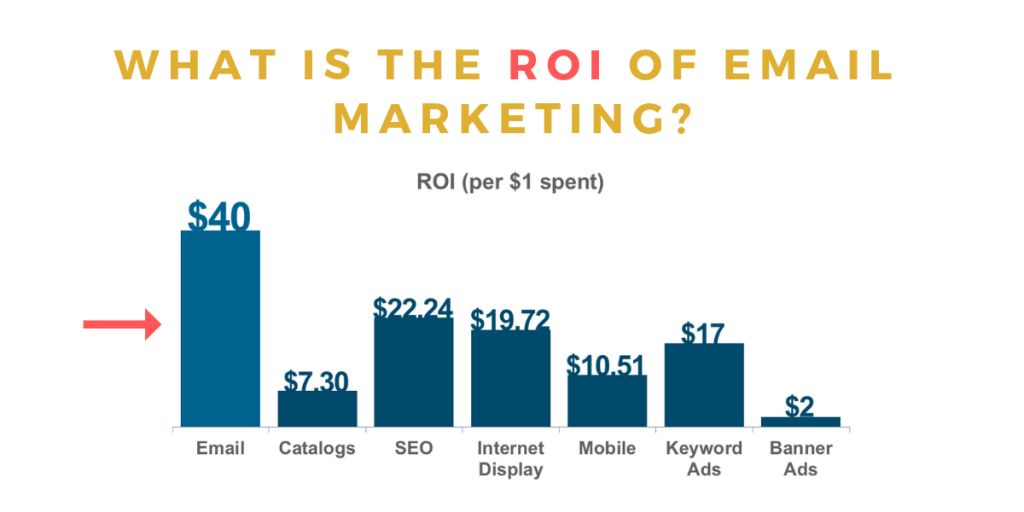
However, you won’t be swimming in money if you don’t use that list.
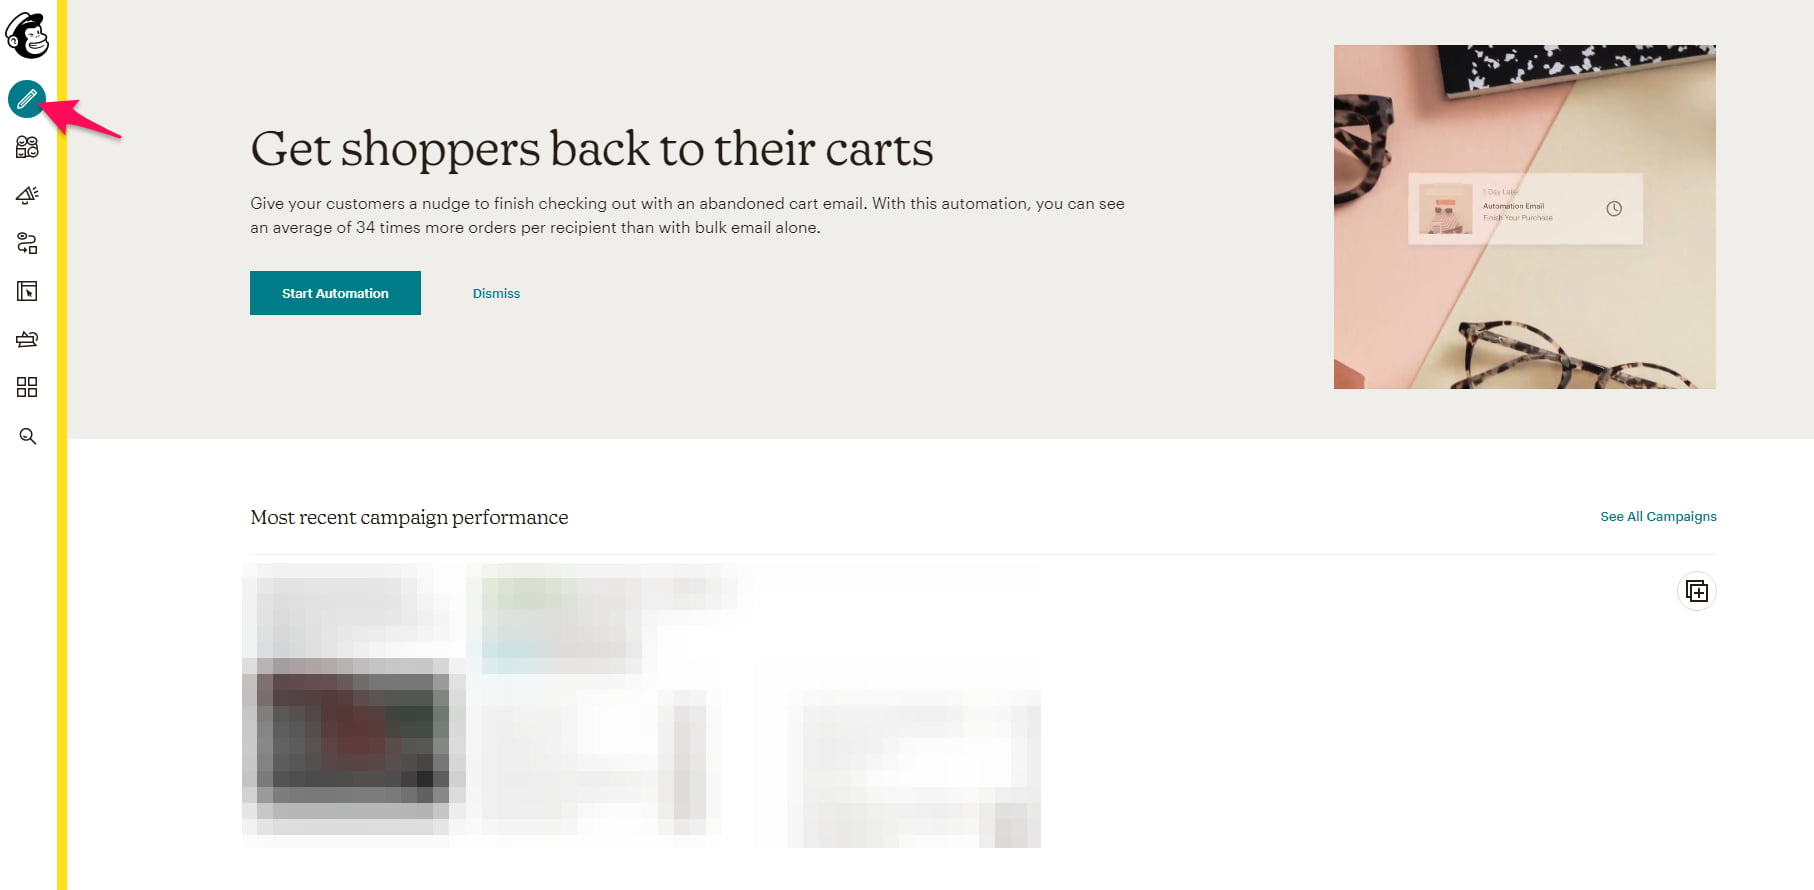
Every time you publish a piece of content, create a new email with your company’s email marketing software.
For example, you can create a new email on Mailchimp by clicking the pencil button.
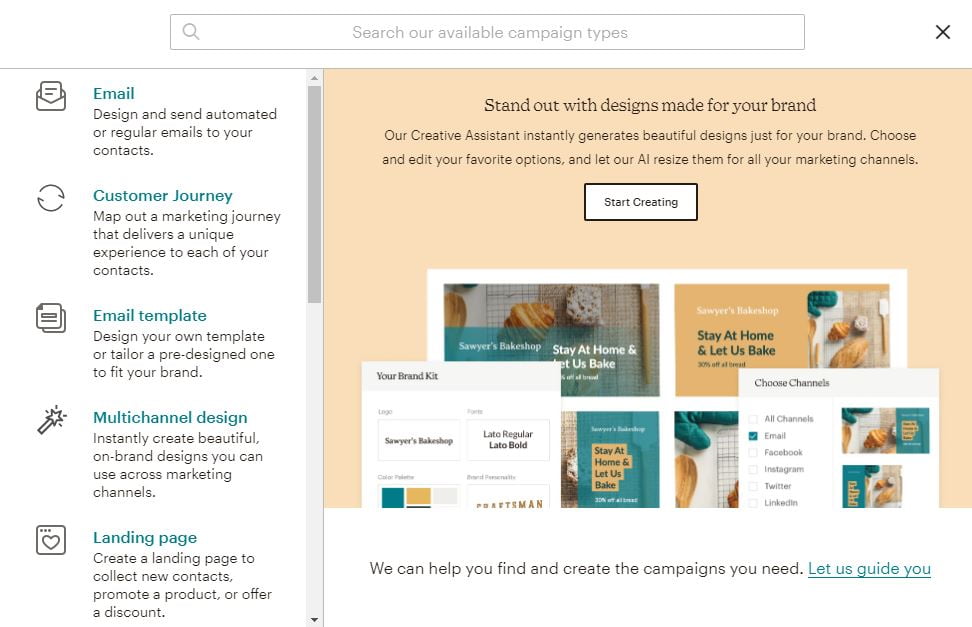
Select the “Email” option from the popup window.
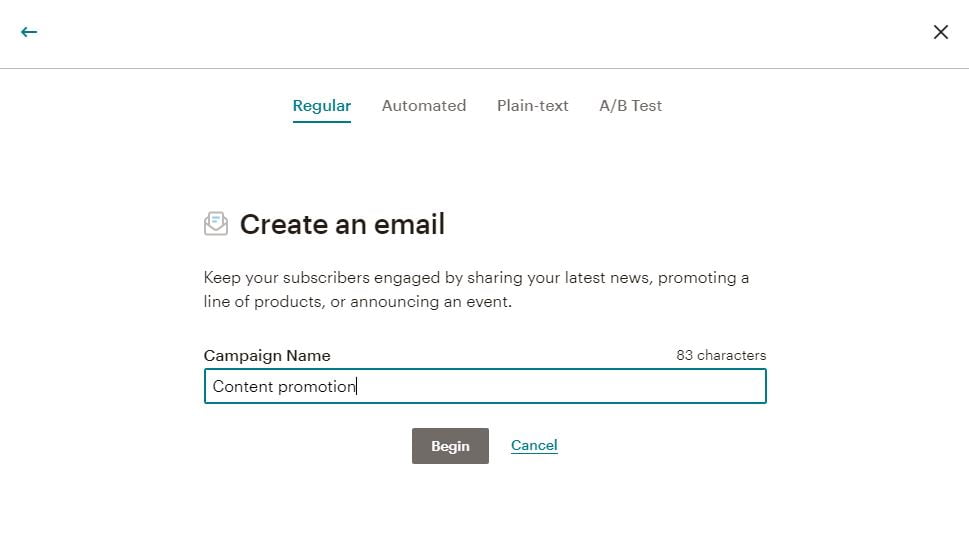
Assign the campaign a name on the next window.
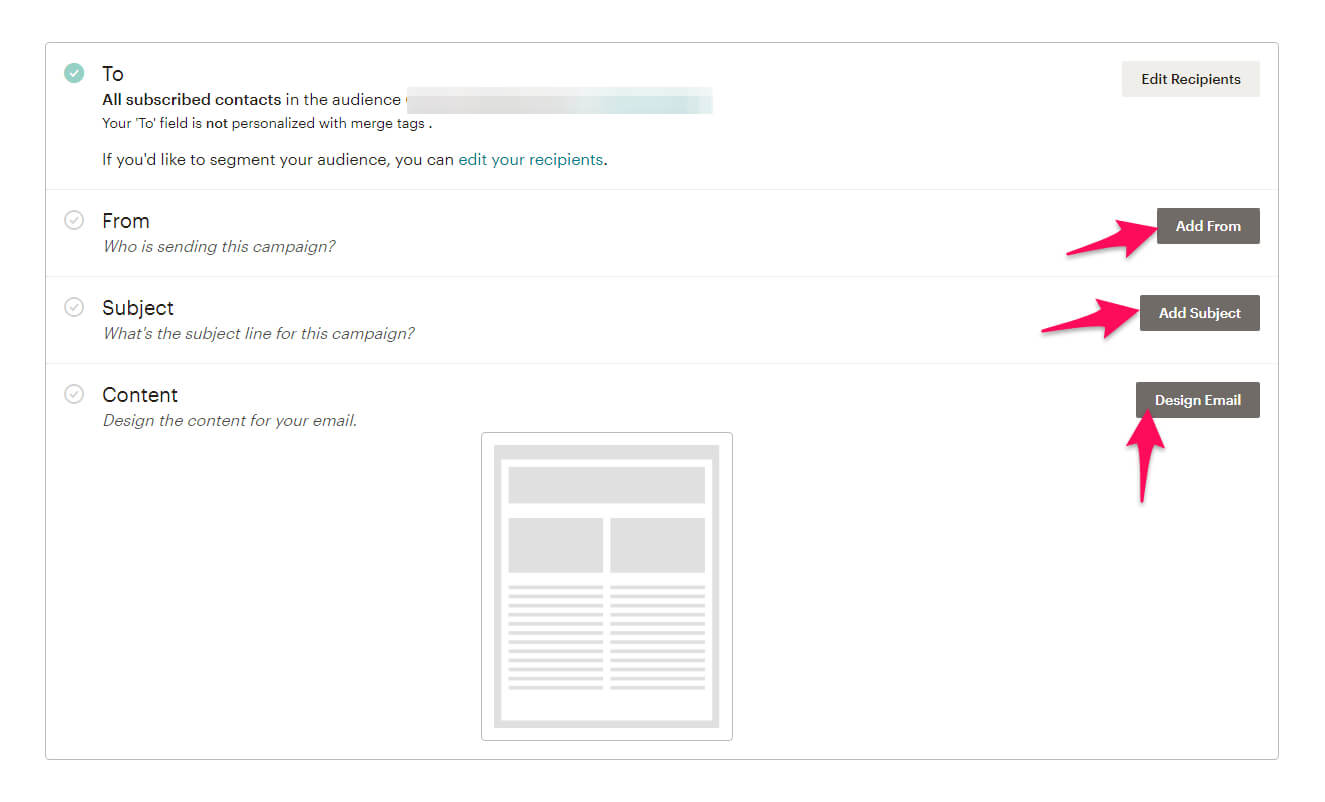
Choose the audience, write an interesting subject line, and click “Design Email” to create the email body itself.
I like using Jim Edwards email copywriting template that goes as follows:
- Question-focused subject line.
- Salutation (“Hey John,” for example.)
- Shocking statement.
- Curiosity bullets that explain the content’s benefits while leaving out some juicy bits.
- Call to action.
- P.S.
It’s also very effective to send out content to influencers in your niche and the companies you mentioned. You’ve already mentioned or linked to their website. There’s a good chance they will reciprocate by sharing it themselves.
Use a tool like Hunter.io to find the email addresses of a marketer or webmaster within the target company. Contact them, explaining you’ve mentioned their brand in your article and would appreciate it if they shared it with their audience.
Final thoughts on forming a content creation process
As you can see, having a documented process for your content creation is an invaluable tool. It reduces the chance of human error, gives content a consistent quality, and makes sure you always reach the right audience.
Let me run you through the steps again quickly:
- Get clear about who you’re writing for. Understanding your buyer persona helps you target better topics and engage a specific audience.
- Use a tool like Conversion.ai to research relevant and interesting content topics.
- Source case studies, data, statistics, graphs, charts, and other resources to back up the claims you make.
- Research SEO keywords to help your content rank organically and drive traffic.
- Establish KPIs such as traffic, leads, and engagement to measure whether or not content is moving the needle.
- Use a content calendar to remain organized.
- Document a content creation process that you can replicate again and again.
- Take the time to edit and proofread your work before publishing it.
- Distribute content through channels like social media and email.
Want coaching from me to take your writing skills to the next level? Explore my online courses.
This blog post was created in partnership with Process Street and Leks Drakos.