The dental industry is worth $31.5 billion dollars as of 2018.
It’s a market that will never go out of business. And if you do it right, you can have non-stop patients coming to you.
If that wasn’t enough, it’s very lucrative. The average dental patient is worth $1,000+, but some procedures cost thousands or more.
Getting dental patients is much easier said than done, though.
You can have the practice, a website, social media, and still not have patients rolling in.
What gives?
Your marketing. It needs a re-haul, and today I’m going to show you what to do in this dental patient marketing guide.
You’ll be learning how to attract patients organically and build a marketing machine that will compound over time.
Keep reading.
Dental SEO and why you need it
Do dentists need SEO? Well, the real question is — do you want free patients? Then, yes!
SEO stands for search engine optimization. It is the practice of optimizing your website and content for search engines to find.
It should serve as the base of your dental marketing strategies.
If your website has good SEO, you rank higher, and more potential patients can find your business. Simple.
But so many dental practices don’t take advantage of SEO at all. Are you one of them?
You’re missing out on patients and revenue if so.
But all is not lost. You can start tuning up your dental SEO at any time and reap the rewards.
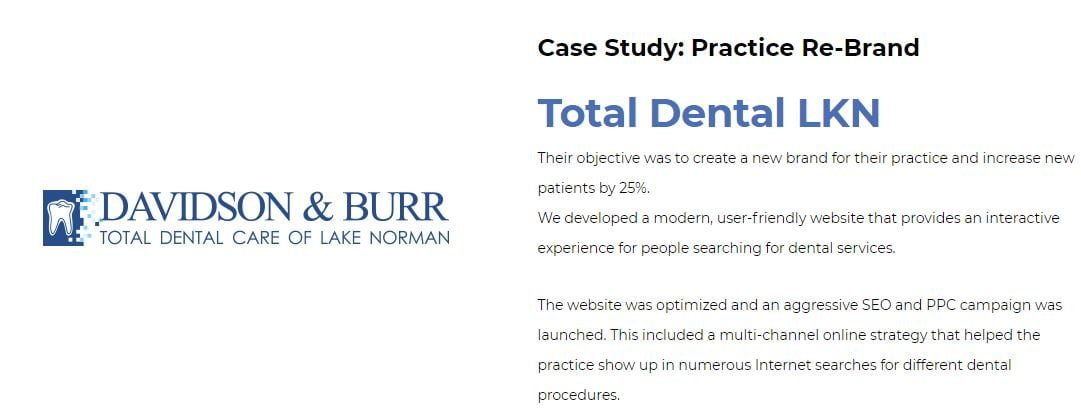
Look at Davidson & Burr. Using SEO and PPC, they were able to achieve up to 25% more patients with the help of a marketing agency. If you want similar results, explore my online training programs.
Research local dentistry keywords
It all starts with using the right keywords. These are phrases that people type into search engines like Google.
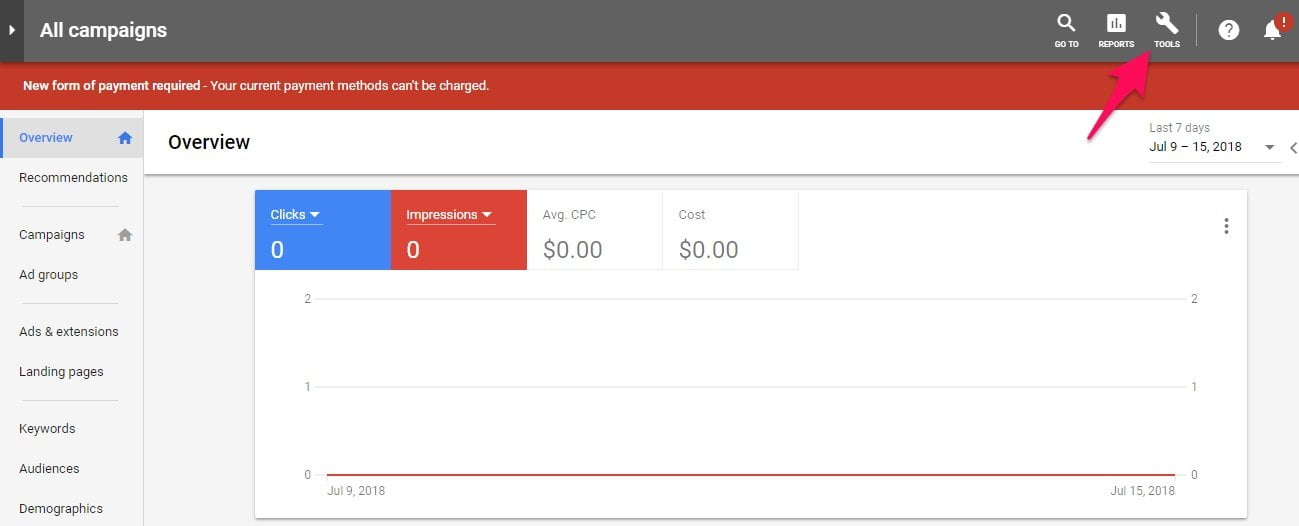
What would your ideal patient be searching for to find your practice? To get ideas, sign up for Google Adwords. You’ll gain access to their exclusive keyword research tool.
Once you’re on the Adwords dashboard, just click the tools menu and select Keyword Planner.
As a dental practice, you want to begin targeting local keywords. These are phrases related to the city and geographical area you’re in that customers would search for. Here are examples:
- Toronto dentist
- Waterloo orthodontist
- Best Oakville dentistry
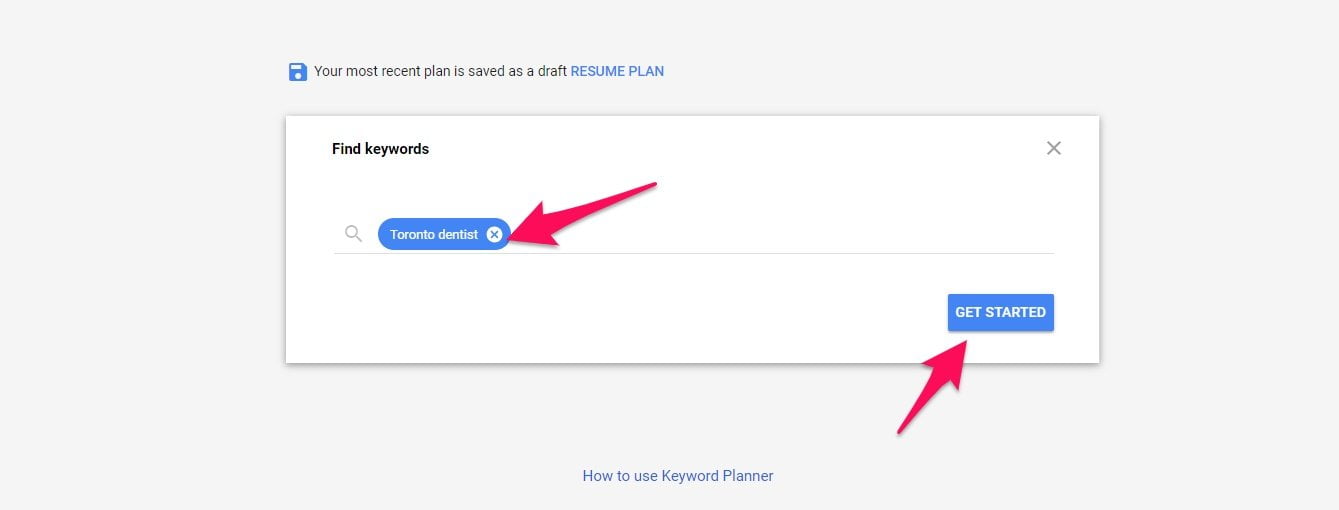
Hit the Get Started button, and Google will display how many searches your keyword has and related ideas. You’ll get tons of inspiration here, and many keywords related to local dentists have a high search volume.
This means that many potential customers are researching for a practice every month, and you can convert them into paying clients.
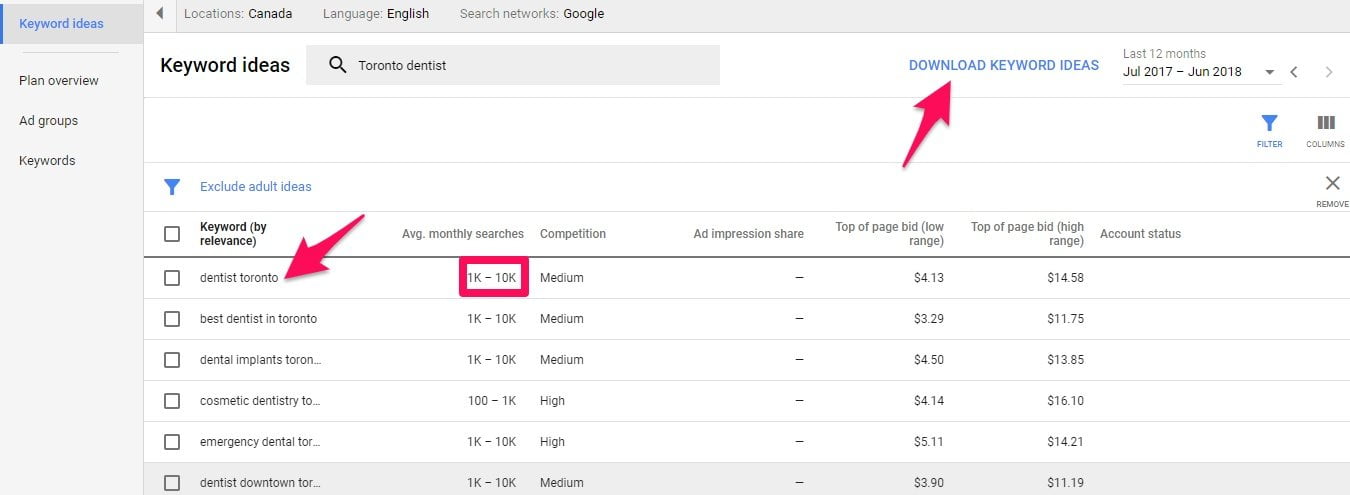
Let’s say that you wanted to use “Best dentist in Toronto.” You should first type it into Google and look at how many results there are.
Depending on where you live, this may be millions, hundreds of thousands, or even lower. The lower, the better, though.
Fewer results mean less competition.
But just because a keyword has a lot of competition doesn’t mean that you can’t outdo them. If there’s one thing I’ve learned in business, it’s that you can always beat the competition with a better product or marketing.
In your case, it’s dental SEO. Not many dental practices use keywords strategically. They’re ranking for them by chance, and that’s where you can step in and beat them.
Here’s what you need to do. Begin by creating an excel sheet with keywords that relate to your practice and area. If you look at the above screenshot, I marked where you can download all of the keyword results for easy editing.
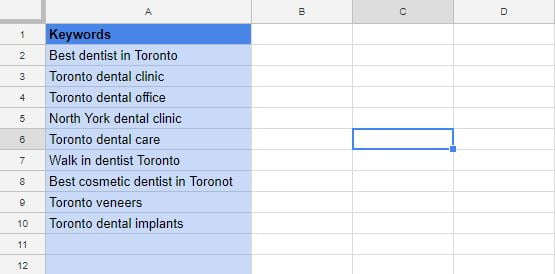
Compile about 10 of the most relevant keywords in your excel sheet. You’ll be referencing back to these often, so it’s best for them to be in an easily accessible place.
How to use keywords
The question that pops up in the mind of every dental SEO practitioner is, “Where do I place keywords?”
It’s a great question, and there are some key spots you’ll want to include keywords on a website.
The first is within the title tag of every page.

When you hover over a tab in your browser, you can see the entire title tag of a website. It also appears as the name of the individual tab.
Google and search engines scan title tags to understand what a website and its content are about. By including keywords here, you increase the chance of you ranking higher.
Take a look at some of your local dentistry competition. Are they using particular keywords in their title tags? If not, you have a great opportunity on your hands to out-SEO them. Don’t miss out on this!
Businesses that use keywords rank 1.5x higher than other businesses that don’t. Enough said.
If you’re not the most tech-savvy individual, you can forward a list of keywords to your web designer or marketing team to do this for you.
Adding keywords into title tags is pretty simple, though. I use WordPress, and by navigating to the page editor, I can change the title tag with ease.
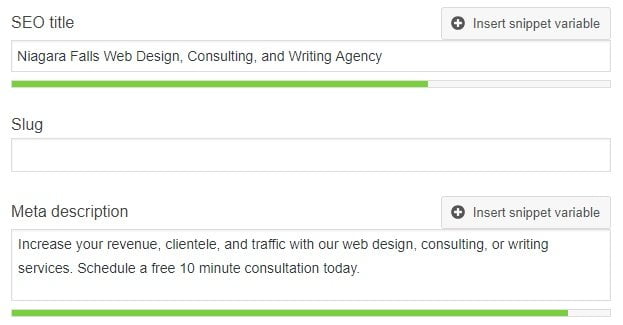
Just below this, you can see the meta description. This is the string of text that is displayed under a search result. While adding keywords to a meta description won’t increase rankings, it can indirectly.
Let me explain.
When a keyword appears in this description, it becomes bold. As a result, users are more likely to click it. Click-through rate helps Google know if a listing is liked by those searching and if so, it will rank higher.
This part of the search algorithm was implemented as a part of their Rankbrain update a couple of years ago.
Next, you want to add keywords to the URLs of your pages. Search engines scan every little detail of your website, and it adds up.
Short URLs are always better. Engines can understand them better, and the same goes for the average person searching.
If they are not optimized, your dental practice will lose out on organic traffic and potential patients. Here’s an example of a poor URL.
![]()
And here is an example of a great URL.
![]()
Can you see the difference? The first just has the individual page ID. Google and users won’t have a clue what the page is about.
The second URL includes an exact keyword and doesn’t have any fluff. I can tell they have some good marketers!
Perhaps most obviously, keywords need to be used throughout the content of your web pages. Don’t try to fool search engines by adding them several times. That’s called keyword stuffing.
And guess what?
Search engines don’t like it. It’s spam and will actually hurt your rankings.
Instead, use keywords sparingly and naturally.
If one of your keywords is “Best dentistry in Toronto,” your about page might say something like, “With 20 years of experience, we are proud to be the best dentistry in Toronto.”
But keywords aren’t just used for the pages of your website, but the content, too. This brings me to my next point.
Use dental content marketing to attract patients
Build it, and they will come. That’s the motto.
But, what are we building, exactly?
Content. And lots of it.
The average cost of a lead with content marketing is $143 versus $373 with outbound marketing. Outbound entails billboards, magazines, Facebook ads, and other tactics that involve going to the patients.
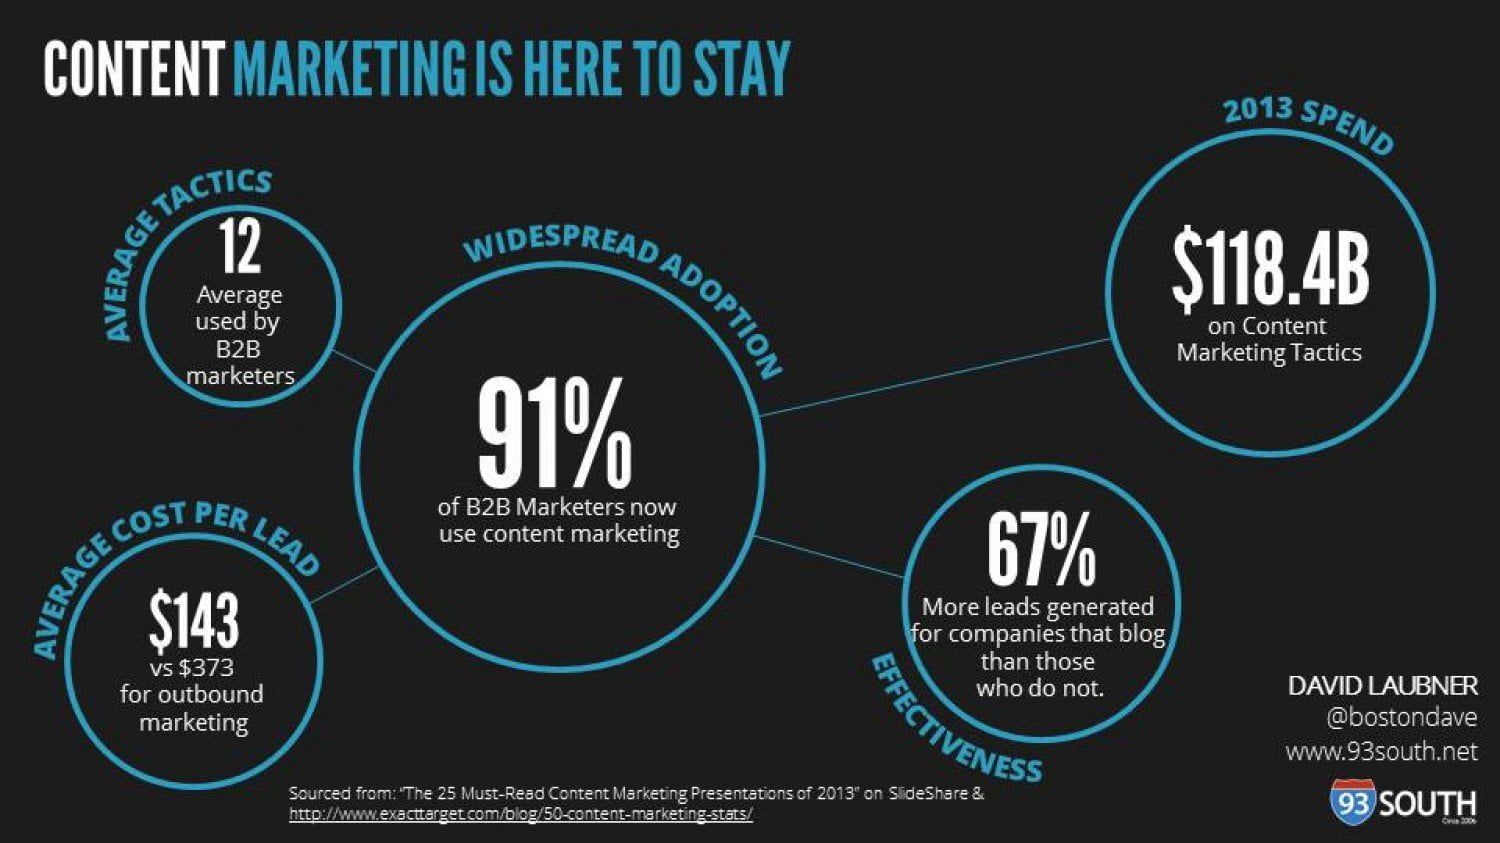
They work, but they are slowly becoming less efficient.
Wouldn’t it be nice if patients just slowly came to your practice instead of spending money on ads and things you don’t even know are working?
It’s possible, you just need to learn some content marketing. And that’s what I’m about to show you.
You have a website, right? That’s where you need to start. Updating your blog with helpful, unique, and valuable content achieves so many things.
But, why do dentists need content marketing?
Because it makes users trust your business more, attracts new patients, and makes you stand out among the quiet competition.
Brainstorm content your patients would enjoy
Before you should begin writing dental content, it’s ideal that you plan it all out. You need to produce articles that your ideal patient would find valuable.
Think about your target demographic. If your practice has been around for a considerable amount of time, this should be easier for you.
What do they value? What questions do they normally ask you when they come into your practice? This information will shape how you craft content.
I recommend creating another excel sheet and creating rows for content ideas, keywords, word count, and the date they should be posted.

Use Google’s Keyword Planner to narrow down keywords that relate to every blog post you write. Note these in your content calendar like above, so you don’t have to research every time.
Don’t write good content, write great content
With ideas, keywords, and a timeline in hand, it’s time to get writing!
Give your blog post a great title that preferably includes a keyword you’ve researched. Titles need to capture someone’s attention and draw them in.
80% of readers will never make it past the headline, so make it amazing.
Consider using stats, a bold statement, or urgency to entice users to click. Take note of how I wrote the title of this very post.
After that, write out a bunch of ideas for various sections of your article. For example, if you’re writing about dentures, sections might include procedure, pricing, benefits, and who should get them.
When you begin writing, you can zoom through as you already know what to think about. Break down your section into header tags. H1, H2, and H3 should be enough.
I also suggest using lists and bullet points where it makes sense. The goal of every post should be to achieve great readability.
Use data, images, and infographics to make your content more credible and enjoyable. No one wants to read a blog post that looks like a Word doc.
Promote the heck out of your content
You hit the publish button, put your hands behind your head, and let out a big breath. It’s all done!
Your masterpiece is finished and will be picked up by Forbes, Huffington Post, and other publications, right?
Not so quick.
Once you’ve finished writing an article, it’s time to promote it.
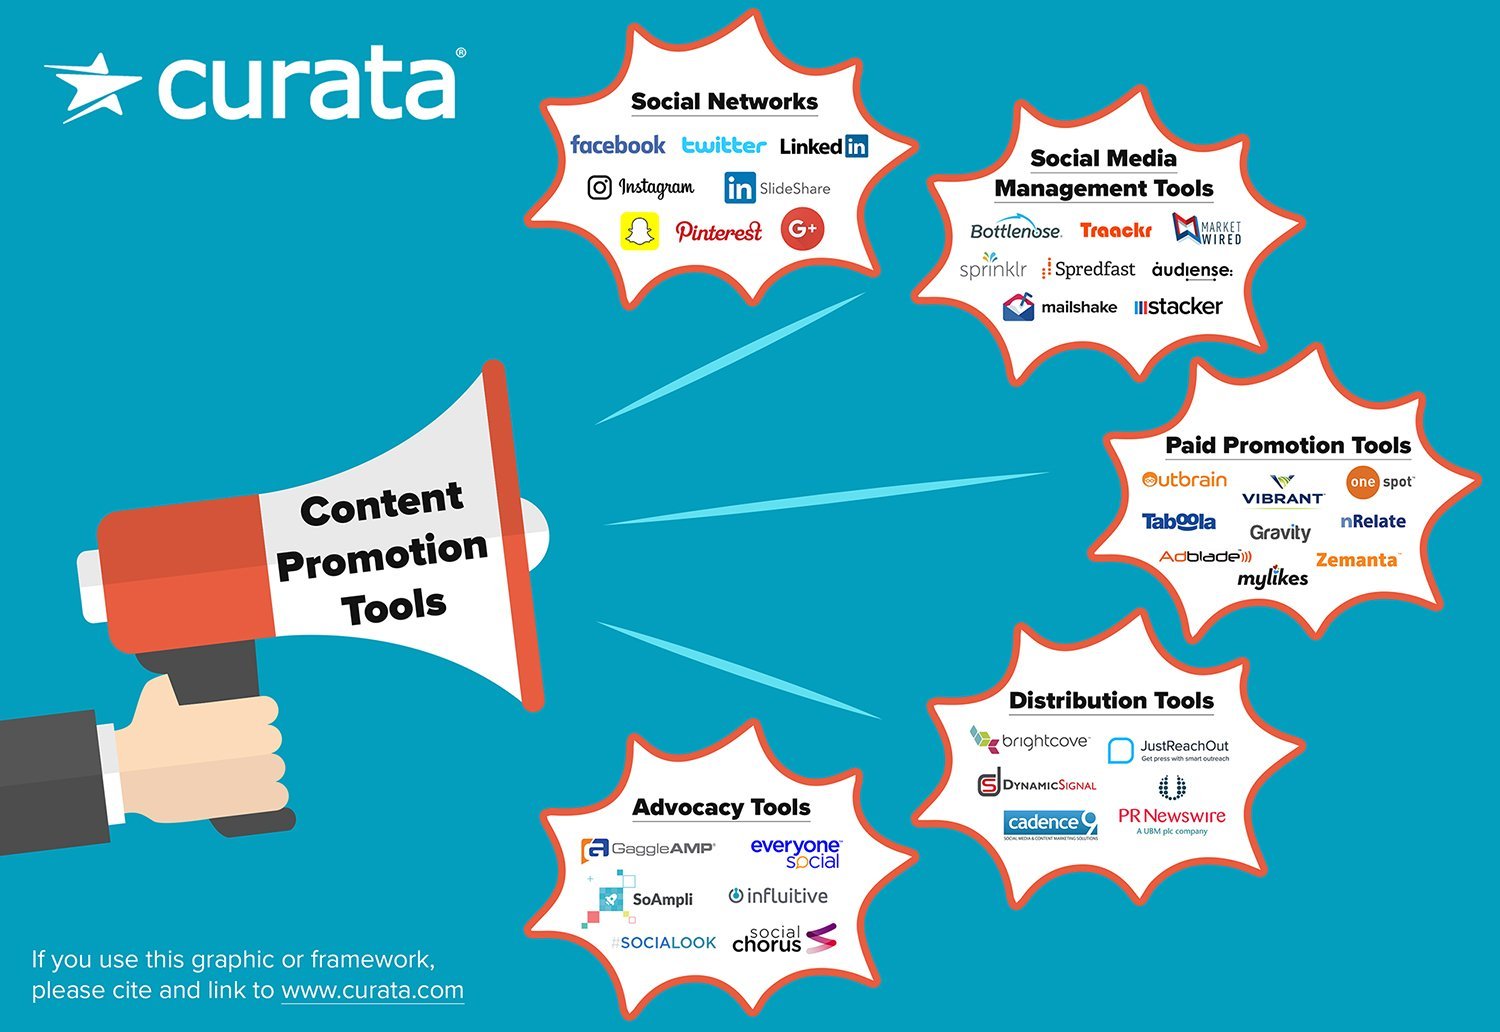
This will help drive immediate traffic to your website. Social media is the best place to start, and if you already have some local followers, it keeps you on their radar.

Your dental practice should have a Facebook page and Twitter account at a minimum. You could make an Instagram to show off the lovely smiles you help patients accomplish.
Every time you write a new blog post, share it across all of the social networks our business is a part of. Use relevant hashtags to increase your reach.
Try using the free tool Hashtagify to get related hashtag ideas and for further analysis.
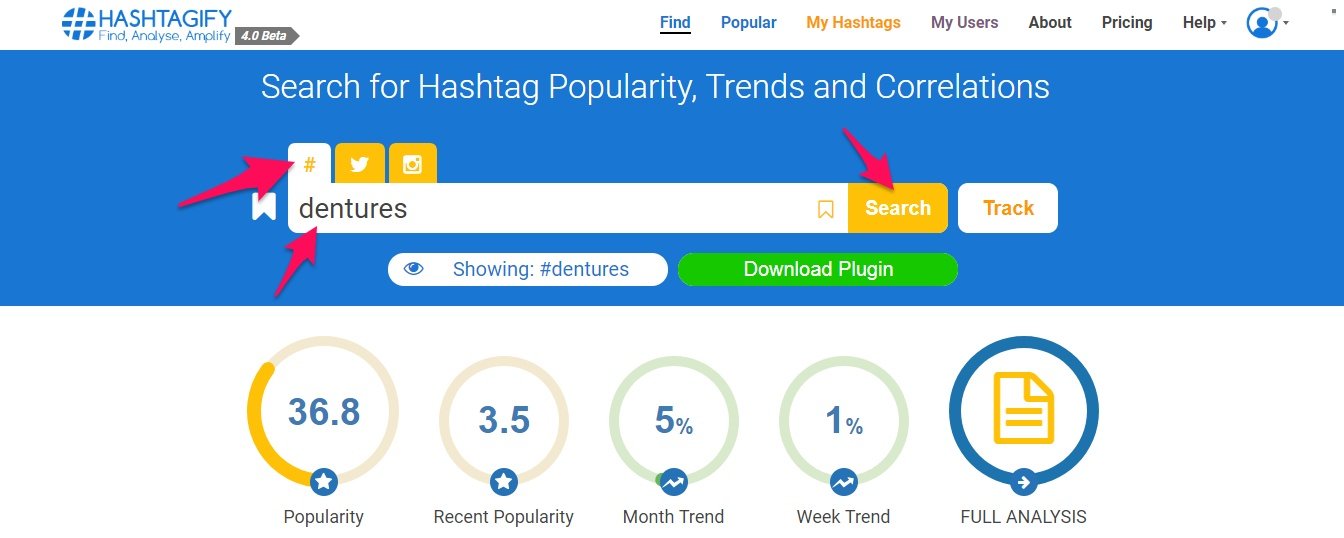
Medium is another free platform you can use to promote your content.
It’s a content-sharing website about anything imaginable, and there’s definitely a demand for dentistry topics.
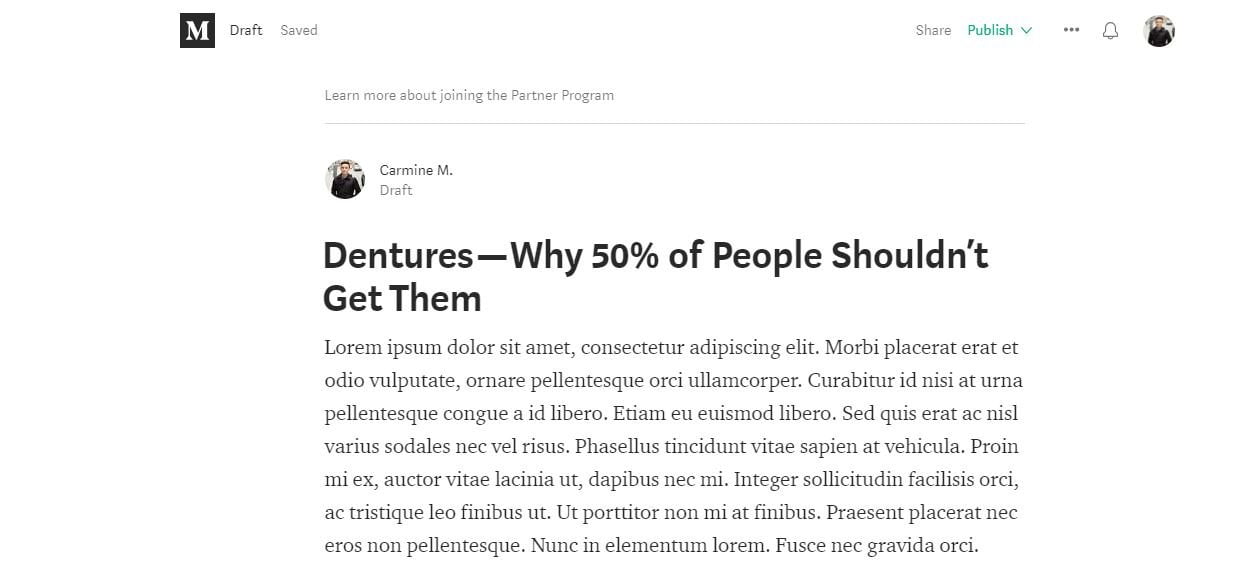
You can literally just copy and paste your article, enter some good hashtags, and you’re done!
Make sure at the end of your post to include a call to action to visit your website, though.
Collect leads to convert into dental patients
96% of users that come to your website aren’t ready to become a customer yet.
So, how do you make them want to become one?
You’re already halfway there by creating valuable blog posts. Users normally read content from a business before giving them money.
But many users will leave the website and possibly never return. There has to be a way to capture their information to keep in contact.
If only there was some kind of email marketing service.
Oh, wait. Mailchimp!

Mailchimp is a free email automation software that will help you develop relationships with patients and stay on their radar.
Not sure you need email marketing? Well, it has an average ROI of 3,800%. And yes, you read that right.
For every $1 spent, you can expect to get $38 back. Not bad, eh?
And email marketing doesn’t have to be overly difficult, either. If you nail the basics, it will help you get more dental patients and serves as a real business asset over time.
No matter if you use WordPress, Wix, Weebly, or any other major website platform, Mailchimp will connect to it. Here’s how to get started with it on WordPress.
First, install a Mailchimp plugin. There are quite a few, but honestly, they all do the same thing. You can create forms, integrate your account, make landing pages, and more.
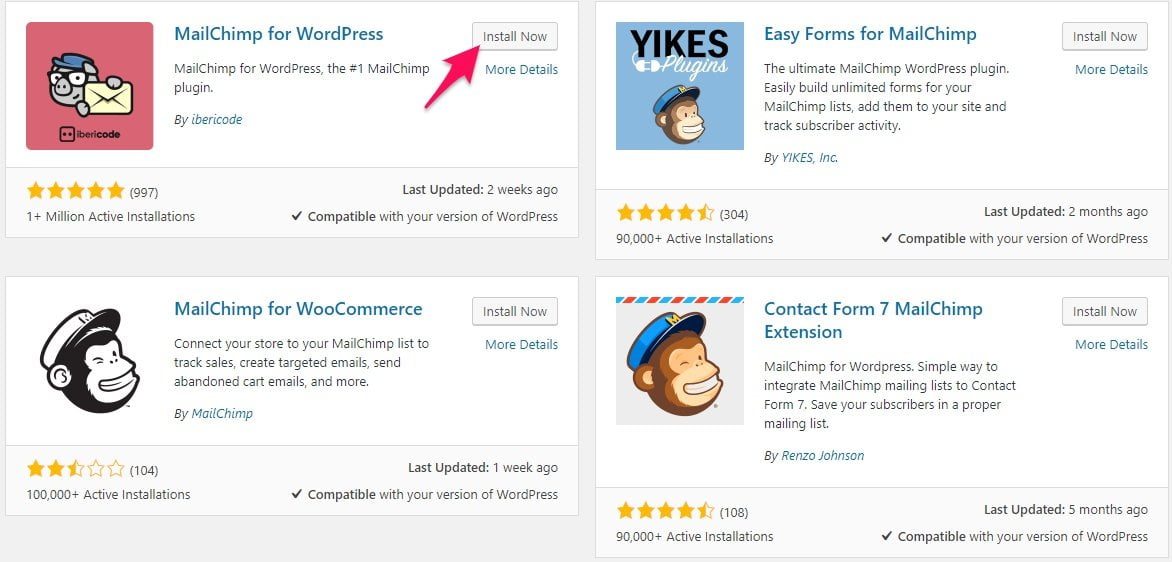
Activate it after installation. You’ll be prompted to connect your account and if you don’t have one, take 30 seconds to sign up.
Afterward, it’s time to create your first form! Visit the plugins dashboard from WordPress and find the new form button.

This might look a bit different depending on the exact plugin you installed, but follow along as best as you can.
There are several different form types, including a sidebar and a popover version. Not every audience reacts to them the same, so start out with one style and test out others in the future.
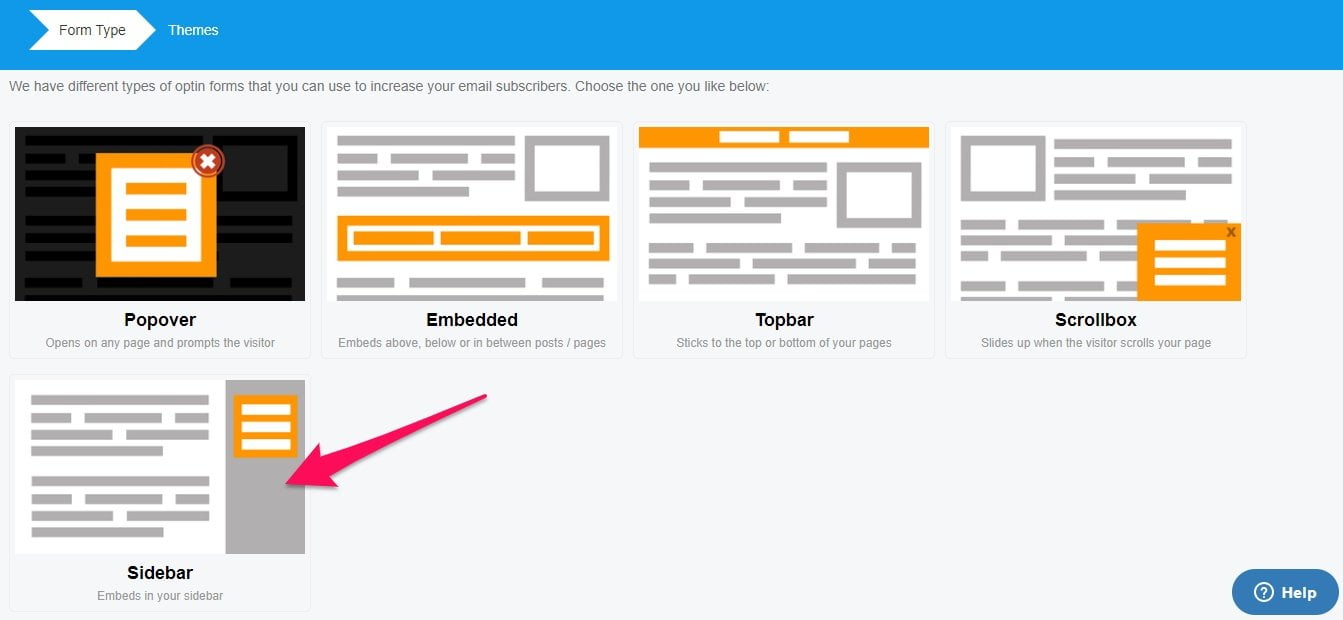
I recommend starting with a simple sidebar. The next step is to choose a template, the key is to make it match the theme of your dental practice’s website.

Give it a name you’ll remember, I’m sure you’ll be making other forms later, so you want to remain organized.
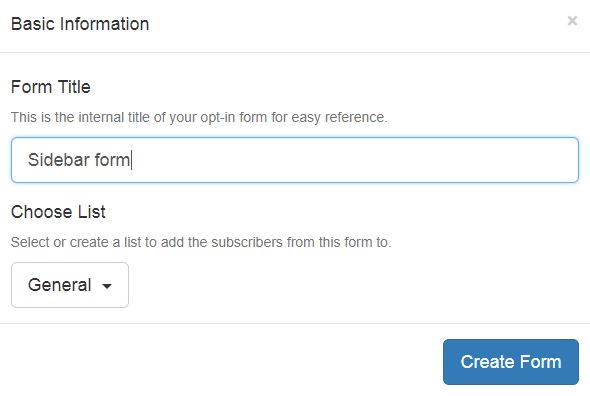
Now it’s time to customize your form. You should ensure that the opt-in use a call to action. This is a phrase that entices users to take action and, in this case, sign up for your newsletter.
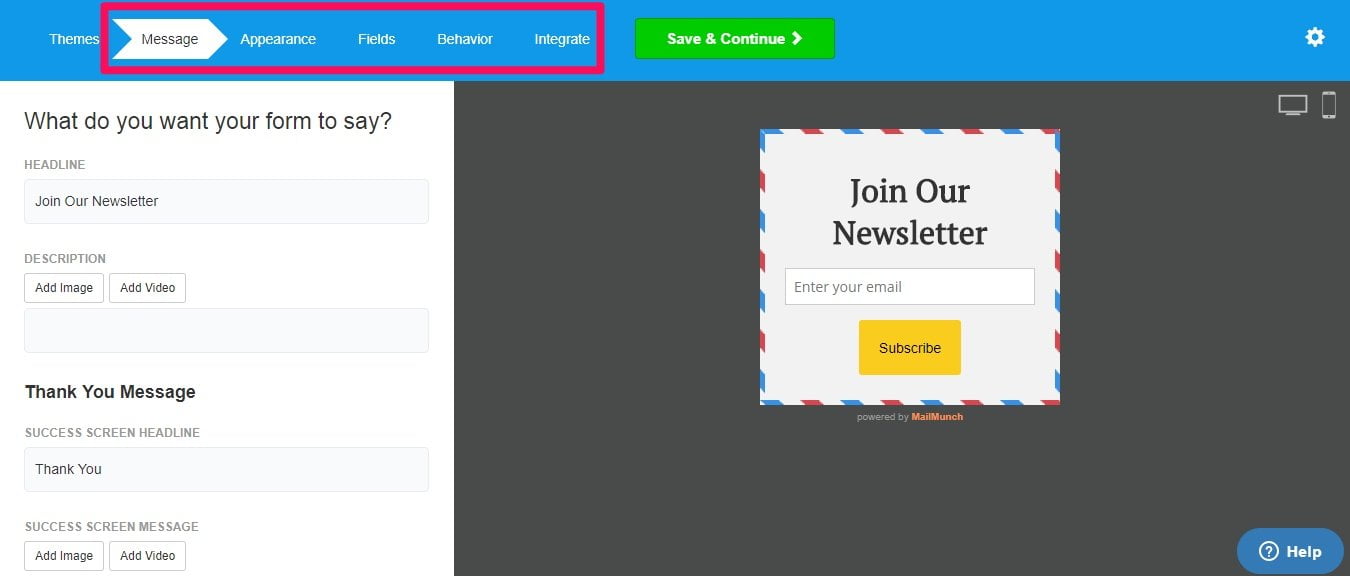
If you’d like to collect more information about leads, add a name and number field. The behavior tab allows you to display it on certain pages or to exclude it from others.
Spend a few minutes getting it perfect, and then publish it! Your form will be placed on your website for interested patients to sign up.
What’s next? Sending out newsletters, of course.
As your list grows, you can send out emails right from the Mailchimp dashboard.
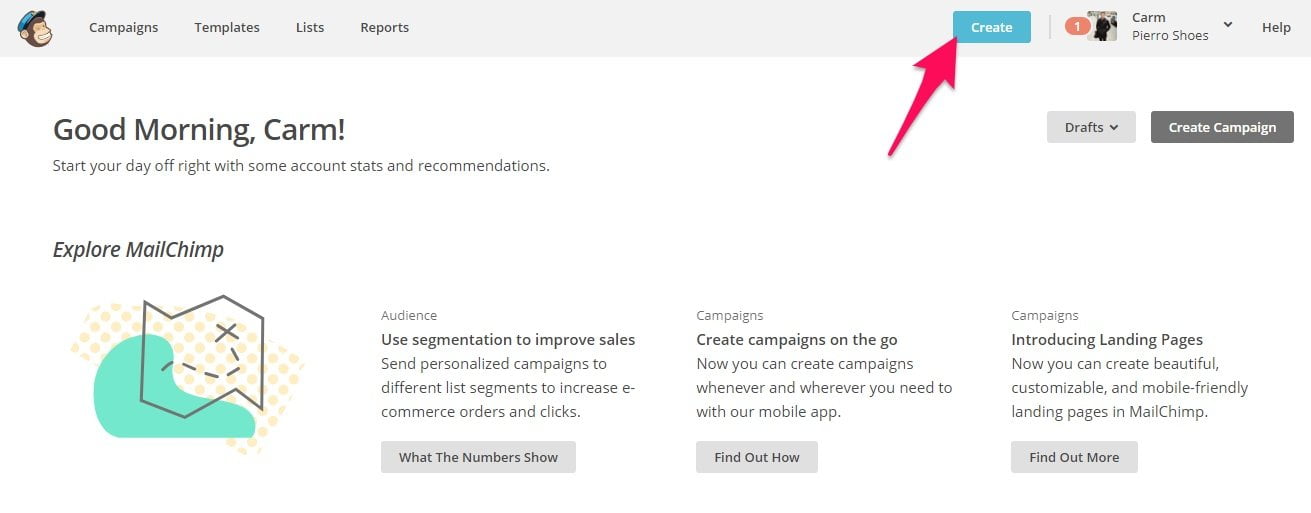
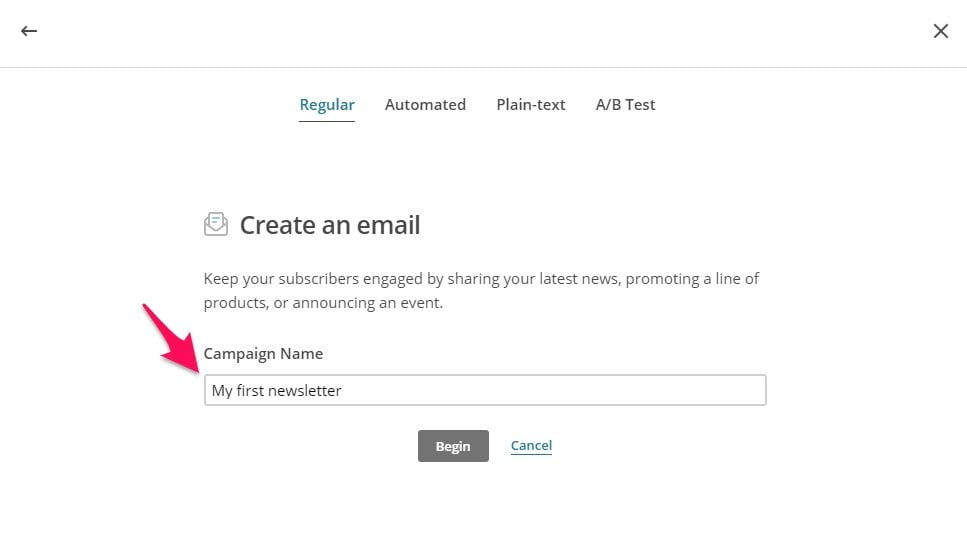
Click “Create” on the top right side of the browser. Select “Create an Email” out of the various campaign types.
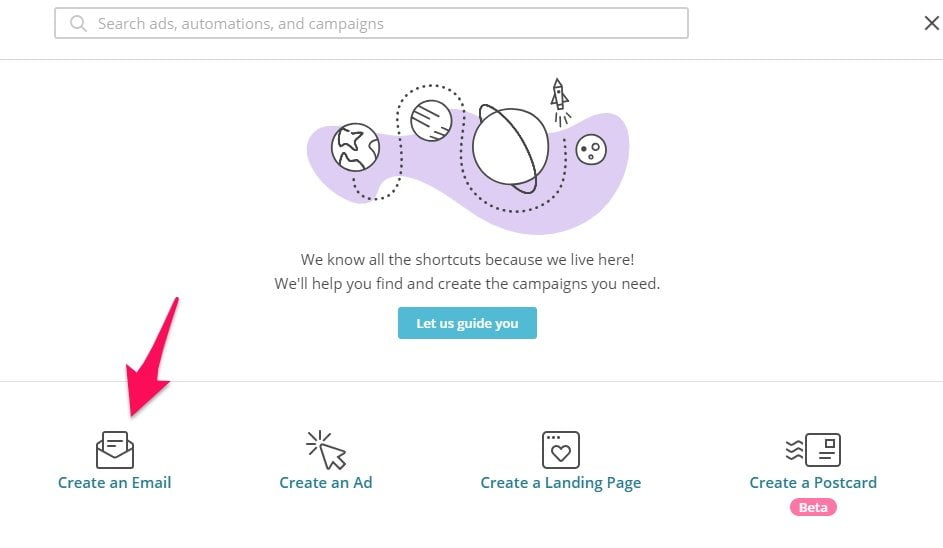
Give your campaign a suitable name and hit “Begin.” There are a bunch of different templates to choose from, such as making an announcement or promoting products.
As a dentist, you’ll most likely want to use your newsletter to update patients on new content, hours, and other useful news.

Select the list of subscribers you would like to send your newsletter to. You can eventually segment them to make emails more personalized and targeted.
Set who you’d like the email to be from, and use a catchy subject line. 47% of emails are opened based on the subject line alone. Use urgency, a bold statement, or stats to draw your subscribers in.
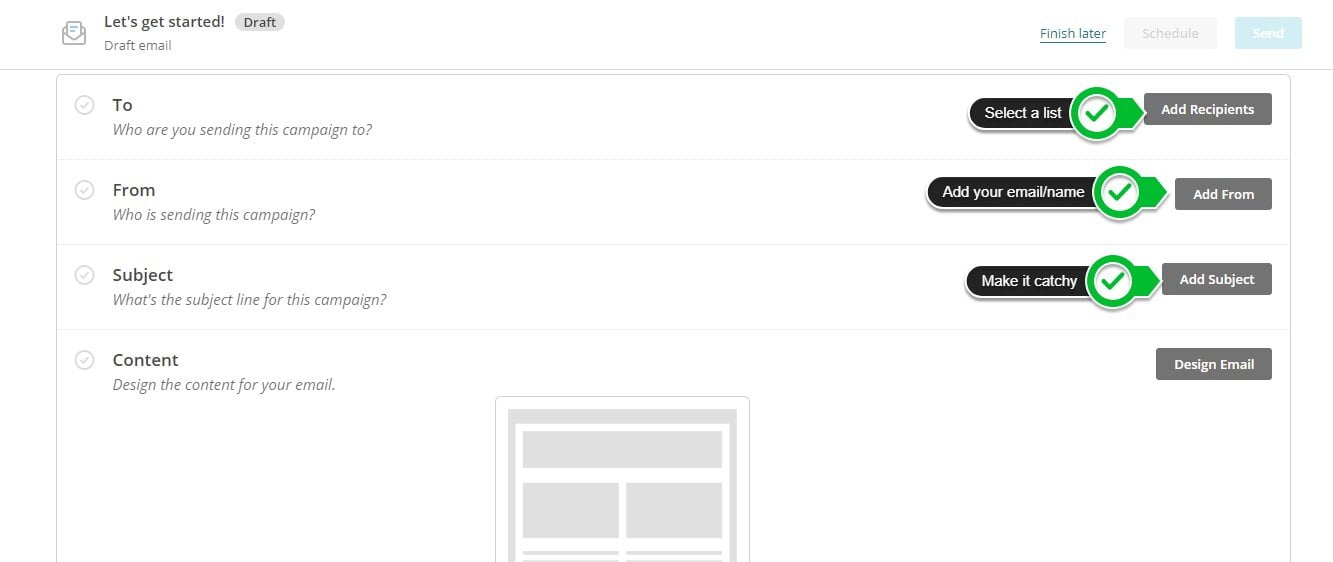
Next, take the time to design a beautiful template. Mailchimp lets you add images, videos, social icons, and anything you could imagine.
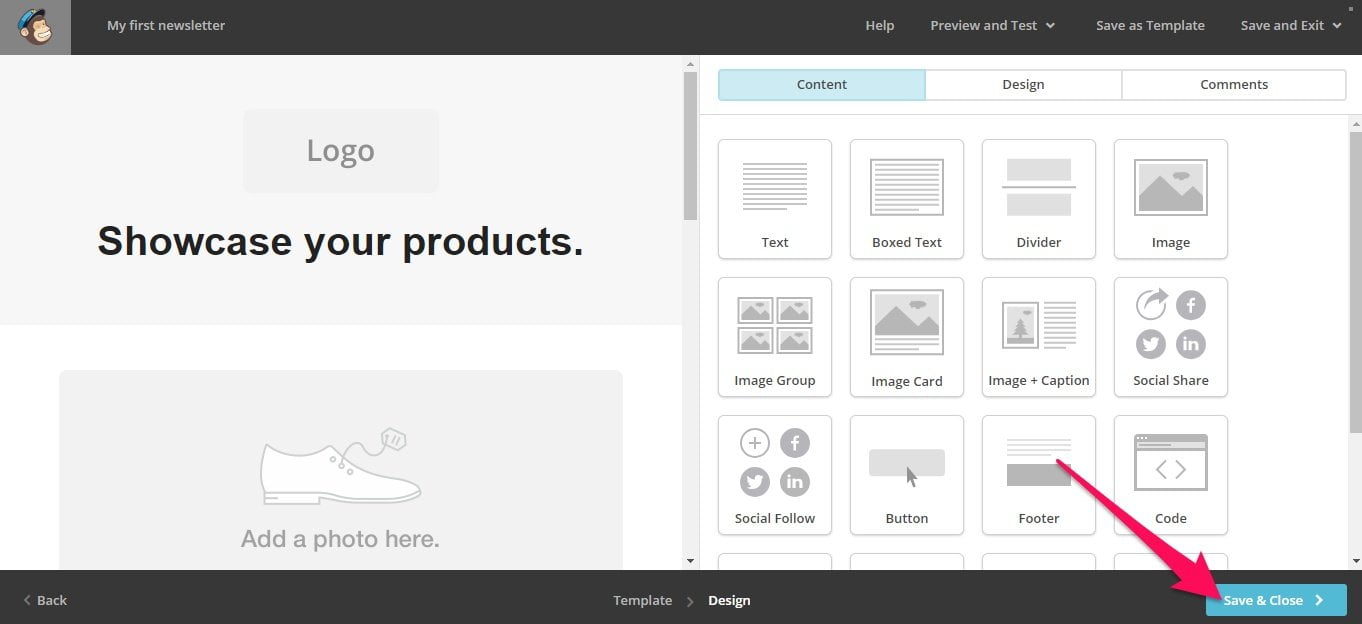
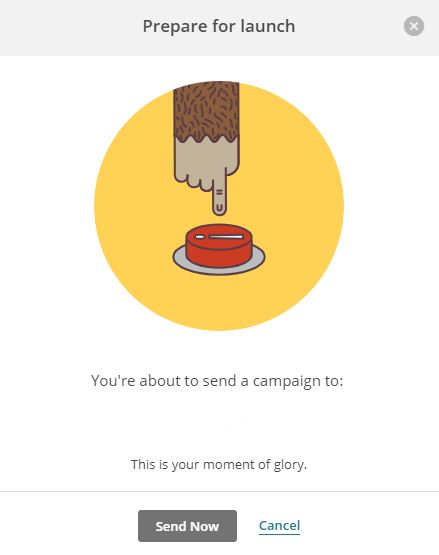
After you’ve completed this step, save, close and you’re ready to send! I recommend previewing your email before sending it out just to double check everything.
 The bottom line on dental marketing
Growing your dentistry business doesn’t have to be tough. You can get new clients passively coming to your business by marketing online correctly.
I recommend beginning by getting your SEO in good shape. Research keywords related to local dentistry services that you can include on your website.
You’ll want to add these to key areas like title tags, meta descriptions, and content. This will help local people find your practice by searching for these phrases.
Content marketing goes hand in hand with SEO. Think about topics and questions that your patients would want to learn about. Do your keyword research and base every blog post around them.
Remember that content and SEO is a 15 to 17-month investment. It takes upfront work but greatly pays off in the future.
Once you have your content and SEO game in check, start growing an email list. Mailchimp is a free tool to do so and very easy to use.
Imagine if you had 1,000 subscribers that you could instantly update with your latest blog posts, services, and news. Some of them will share it, creating a viral effect.
These are timeless strategies that compound with time and are low-cost investments with huge ROI. What are you waiting for? Get to work and start acquiring more patients!
If you need help with marketing your dental practice, explore my online courses to learn more about digital marketing.


 The bottom line on dental marketing


